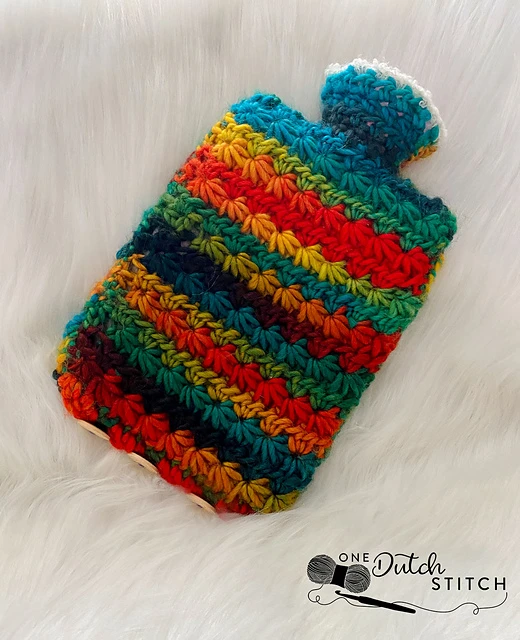
The Star Stitch Hot Water Bottle Cozy is a perfect last-minute gift for Christmas or even just a snuggly cozy for your own hot water bottle!
Don’t forget to follow me on your favourite social media platform (Facebook, Instagram or Pinterest) so that you do not miss out on any of my upcoming free crochet patterns! You can also join the new One Dutch Stitch Crochet Community Group on Facebook where you can ask questions and share your One Dutch Stitch projects.
Save for Later
If you want to make the Star Stitch Hot Water Bottle Cozy don’t forget to save it for later! You can also find the links below for the inexpensive PDF patterns on Etsy and Ravelry:
〜 Get the Ad Free, easy to follow, large print, printable PDF pattern on RAVELRY.
〜PIN this pattern to your Pinterest boards for later HERE.
〜Add this pattern to your Ravelry queue HERE.
Materials
Yarn Weight: Yarn group: Super Bulky
Suggested Yarn: Philar Terre Nueve
Yarn Quantity: 161meters
Hook: 8mm
Other materials: Scissors, large blunt needle, 2x stitch markers, 3x buttons and a measuring tape.
Gauge & Sizing
5 motifs (stars) x 6 rows in each 4″ x 4′ (10cm x 10cm). To make a gauge swatch follow the pattern stitch (rows, 1, 2, 3) until you have a swatch slightly larger by than 4″ x 4″ (10cm x 10cm). Use correct hook size to achieve gauge.
The Star Stitch Hot Water Bottle Cosy is made to fit a 2 litre hotwater bottle with the following dimensions:13″ x 7.5″ x 2.75″ (length x width x depth).
Abbreviations & Terminology
US Terminology
st(s) stitch(es)
ch(s) chain(s)
tch turning chain
hdc half double crochet
Multiples: The pattern stitch uses multiples of 2sts + 1st & 3sts for the foundation chain. To make a custom size then chain in multiples of 2 until the chain is just wide enough for the hot water bottle, chain 1 more. Then chain 3 for the foundation chain. 5 motifs (stars) x 6 rows in each 4″ x 4′ (10cm x 10cm). To make a gauge swatch follow the pattern stitch (rows, 1, 2, 3) until you have a swatch slightly larger by than 4″ x 4″ (10cm x 10cm). Use correct hook size to achieve gauge.
Important Notes
1. This hot water bottle cosy is constructed using two identical panels that are sewn together. It is also possible to work the star-stitch in the round.
2. The cover for the bottle-neck opening is added to the top of each panel.
3. After the front and back panels are sewn together a row of half double crochets is made on the bottom of the cover. This row includes 2 or 3 chain spaces and skipped stitches as button holes.
4. The buttons are sewn onto the front side of the cover at the bottom.
5. A slip stitch edging is added to the bottle-head opening.
Resources
You can watch a video tutorial for the mattress stitch from Heart
Hook Home HERE
Chain 22 (9 star motifs and 1hdc). *TIP* After completing row 1 check that it fits across the hot water bottle. Add or remove in multiples of 2 to make the panel wider or narrower.
Front & Back Panels
Make x 2
Foundation Chain
Chain 22 (9 star motifs and 1hdc). *TIP* After completing row 1 check that it fits across the hot water bottle. Add or remove in multiples of 2 to make the panel wider or narrower.
Row 1
Step A: Insert hook into the 2nd chain from the hook and pull up a loop. Repeat in the 3rd, 4th, 5th & 6th chains from the hook. You should now have 6 loops on your hook. Yarn over and pull through all 6 loops. Ch1 to close the star stitch.
Step B: Insert hook into the ch1 used to close the star stitch and pull up a loop. Insert hook into the side of the last spike of the completed star stitch and pull up a loop. Insert hook into the same chain as the last loop of the completed star stitch and pull up a loop. Pull up a loop in each of the next two chains. You should now have 6 loops on your hook.Yarn over and pull through all 6 loops. Ch1 to close the star stitch. Repeat Step B until the end of the row. To finish make 1hdc into the last stitch of the row. This is the same stitch as the last loops of the last star, turn. Making the last stitch of the row into this stitch will ensure there is no gap left at the end of the row, turn.
Row 2
Ch2, Identify the centre of each star that was made by the closing ch1 of each star stitch of the previous row. 2Hdc into the center of each star to the end of the row. Finish the row with 1hdc in the last stitch of the row, turn.
Row 3
Ch3, insert hook and pull up a loop in the 2nd chain and the the 1st chain. Insert hook into and pull up a loop in the next 3 stitches. You should now have 6 loops on your hook. Yarn over and pull through all 6 loops. Ch1 to close the star stitch. Repeat step B from Row 1 to finish the row.
Rows 4 – 16
Repeat rows 2 – 3. *TIP* If making a custom size then make as many rows as needed to cover the hot watter bottle (remember to end on a repeat of row 2).
Bottle Neck Section
Onto the top of the front-panel and back-panel an extra section will be added now to cover the neck of the hot water bottle. On each panel, measure an equal amount of stitches in, leaving 6sts (or enough to comfortably cover the base of the hot water bottle neck) in between the stitch markers (indicated with the green arrows).
Row 1: Into the stitch beside the first stitch marker (the stitch marker on the right-hand side), ch1, 1hdc in the same stitch. Hdc in each stitch to the end of the row. The last stitch of the row should be made into the stitch before the last stitch marker (the left-most stitch marker), turn (6 sts).
Row 2: Repeat row 1 (6 sts).
Rows 3: Ch 2, 2hdc into the same stitch. 1hdc until the last stitch of the row. Into the last stitch make 2hdc, turn (8 sts).
Row 4: Repeat row 1, yarn off and weave in loose ends (8sts).
Repeat to add the bottle-neck cover for the second panel.
Image for Bottle Neck Section
Seaming the Panels
1. Lay the back-panel on a flat surface with the right-side facing downwards. Place the front-panel directly on top of the back panel with the right-side facing upward.
2. Using the mattress stitch sew the sides of the panels together. Start from the bottom right and corner and work your way up to the top, right-hand side of the bottle-neck section. Yarn off and weave in loose ends. Make sure to leave the bottom open (this is where you will add buttons) and the very top for the bottle neck open (indicated with the green arrows).
3. Repeat this process on the other side of the panels, starting at the bottom left-hand side.
TIP: You can also join the panels using the slip-stitch method (or any preferred joining method).
Image for Seaming the Panels
Adding the Buttons
Preparation: Turn the panels upside down. If using 3 buttons take 3 stitch markers and place them evenly across the bottom of the panel. You will be placing the stitch markers into the bottom of the foundation chain (indicated with the orange arrows).Then yarn on to the original foundation chain at the seam on the right-hand side (indicated with the green arrow).
Round 1: Ch1, 1hdc in the same stitch. *1hdc in each stitch until you have reached the point marked off for the first button-hole. Ch1 and skip a stitch; Rep from * until you have made the desired amount of button holes. Continue to make 1hdc into each stitch until you have reached the end of the other panel. Finish the round with a slip stitch in the 1st hdc of the round. Yarn off and weave in loose ends.
Sewing on the Buttons: Place the cover in front of you with the front panel facing you. Sew on each of the bottoms onto the row of half double crochets you have just made on the side without the ch1 spaces. Make sure to position each button on the front panel directly opposite the button holes you have made on the back panel (with the ch1 and skipped stitches).
Image for Adding the Buttons
Finishing Touches: The Edging
The sample hot water bottle cover has a slip stitch round using Drops Bouchle with a 5mm needle around the top of the bottle-neck section. You can use any preferred type of yarn for the edging (including the same yarn used for the panels).
Round 1: Yarn on at the edge of the bottle-neck at the seam. Ch1, slip stitch in each stitch the end of the round. If using a finer yarn (such as Drops Bouchle) then make 2 slip stitches in each stitch. Yarn off and weave in loose ends.
Thank You
I hope you have enjoyed making the Star Stitch Hot Water Bottle Cozy as much I have designing it. I would love to see your finished pieces, you can share them with me here:
〜 Tag your work on instagram with #onedutchstitch
〜 Share on the One Dutch Stitch Facebook Community
〜 Pin it on Pinterest
If you have any questions or feedback I am always happy to hear from you. You can find my contact details on my contact page by clicking here.